3. Teleport Unity SDK
The Teleport Unity SDK provides everything necessary to run a Teleport server as a Unity application. In typical usage, only the server need run Unity - the client will be a standard Teleport client app such as the Teleport reference client.
3.1. Getting Started
You can:
Get the example project TeleportUnityExample, or
Install the plugin to an existing project.
3.1.1. Get the Example Project
You can download a minimal example Unity project for Teleport at git@github.com:simul/TeleportUnityExample.git. Be sure to update the submodules: the actual Teleport plugin is a submodule at Assets/Teleport in the example repo.
3.1.2. Install the plugin to an existing project
Get the Teleport Unity plugin from its Git repo at git@github.com:simul/teleport-unity.git.
Or download it as a .unitypackage from https://teleportvr.io/downloads.
You can install it as a Git submodule or copy the code directly, it should go in a subfolder of your Unity project’s Assets folder, e.g. Assets/Teleport.
From your unity project, launch the Package Manager, and install the Core RP Library.
3.1.3. Building the Unity Server from Source
If you’ve installed the Teleport Unity SDK as a prebuilt package, you’re ready to go. But if you’re building the Teleport C++ Server SDK from source, you’ll need to follow the instructions in the Server section of this documentation. Use CMakeGui to set:
TELEPORT_UNITY to true
TELEPORT_UNITY_EDITOR_DIR to the folder where Unity.exe resides.
TELEPORT_UNITY_PLUGINS_DIR to the folder Plugins/x86_64 in the Teleport Unity assets folder, so that the C++ SDK will build TeleportServer.dll to that directory.
TELEPORT_UNITY_PROJECT_DIR to the root folder of your Unity project.
Then build the Teleport_Server_Unity.sln solution. You can run Unity as normal, or debug the C++ code by setting TeleportServer as the active C++ project in the solution, and launching it for debugging.
3.2. Configuration
First, activate the Teleport render pipeline. This adds functionality for video streaming and lighting generation. In the Edit menu, under Project Settings…, select Graphics. Set the Scriptable Render Pipeline Settings object to point to the Default Teleport Render Pipeline, found in Teleport/Resources.
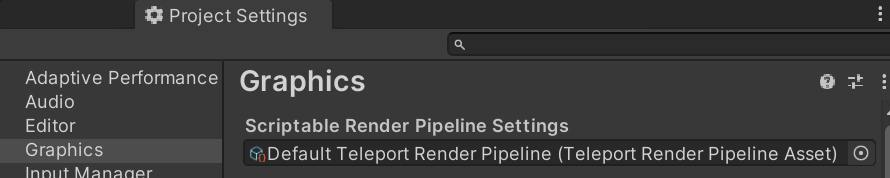
Graphics Project Settings panel
You can also create a Teleport Render Pipeline asset in the Content window with Create/Rendering/Teleport Render Pipeline Asset.
For global settings for the plugin, in the Project Settings panel, select Teleport VR.

Teleport Project Settings panel
3.3. Resource Management
Resources in a Unity project can be streamed to clients if they have been extracted - i.e. if they have been converted to and stored in, the standard formats that the Teleport protocol uses.

Select the “Teleport VR” menu from Unity Editor’s menu bar, and click on “Resource Manager”. The Resource Manager window will open.

To extract all streamable resources in a scene, click “Scene Geometry: Extract”. This is all you will usually need to do. To extract the resources of a specific object, select it and click the “Selected Geometry: Extract” button. Separately, you can also extract the Global Illumination textures (generated by Unity from static lights), or the Dynamic Object Lighting Textures: these are the cubemaps for specular and diffuse lighting generated by the Monitor.
There are two main Ways to setup objects for streaming:
By Tag
By Root
3.4. Usage
You can create a GameObject in Unity that has the Monitor component. If not, one will be created when you run the project.
When running, the server awaits connections via the Teleport protocol. When a client connects, the server creates a player instance.
A client, when connected, will maintain a list of Nodes (i.e. GameObjects in Unity) that are relevant to it. The space around the client’s own position is called its Area of Interest (AOI). The server will send it updates for all Nodes within its AOI.
3.5. Inputs
To show the Inputs Panel, select Inputs from the Teleport VR menu on the main menu bar. Here, you can specify the inputs you want to receive from connected clients.

Teleport Inputs Panel in Unity Editor
There are three elements to each input. The Name is arbitrary, but should be unique in the application. The Type specifies what kind of input this is. A Float input is floating-point, while a boolean is either on or off, true or false. A state input is updated continuously, whereas an Event input is only updated when it changes. Finally, the input’s Path is how the client knows what to map it to.
Teleport VR clients use OpenXR interaction profiles to know what inputs the XR hardware provides. Each input (buttons, triggers, poses etc) has a path that is mapped by the OpenXR runtime on the client device. When a Teleport client connects, it tries to match the path of each server-specified Teleport input to the OpenXR paths of its hardware. If any part of the OpenXR path matches the Teleport path, the mapping is made. One or more Teleport inputs can be mapped to a single OpenXR input if the paths match. Teleport input paths use Regular Expression syntax to match OpenXR paths.
For example, if the client recognizes your hardware as supporting the Oculus Touch Controller Profile:
/interaction_profiles/oculus/touch_controller
It will have the path:
user/hand/left/input/x/click
to represent the “x” button on the left-hand controller. We might specify a control:
Name |
Type |
Path |
|---|---|---|
Toggle Onscreen Display |
Boolean Event |
left/input/[a|x]/click |
The regex syntax [a|x] means “either ‘a’ or ‘x’”, so the client will recognize this as a match, and map the “x” button on the client-side controller to the “Toggle Onscreen Display” boolean event that the server will receive.
3.5.1. Mapping types
Different control types can be mapped to each other. If a path match is found, it is possible for a boolean (“click”) action, which is only on or off, to be mapped to an Analogue input.
Teleport / OpenXR |
OpenXR Boolean |
OpenXR float |
OpenXR pose |
|---|---|---|---|
Teleport Boolean |
Yes |
Yes, client decides |
No |
Teleport Analogue |
Yes: false=0.0, true=1.0 |
Yes |
No |
The mapping of an OpenXR floating-point input to a Teleport Boolean input is determined by the client application. The usual method is by hysteresis, so when the control goes above a certain threshold, it will be considered to be “true”, and when it goes below a lower threshold, it will revert to “false”. Teleport cannot map OpenXR Pose actions to inputs, these are handled differently.
3.5.2. Pose Mapping
XR devices such as headsets, handsets and trackers report their state as a “pose”, containing position and orientation in space. These poses can be mapped to spatial nodes using the Teleport Controller component in Unity.
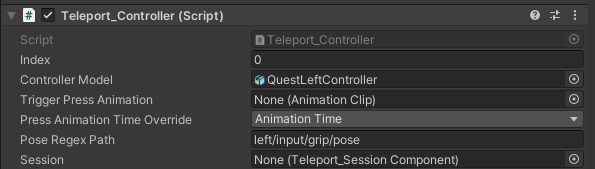
==Teleport controller component in Unity Inspector==
The “Pose Regex Path” for a controller is matched client-side to an OpenXR path representing a pose state. When this mapping occurs, the object will be controlled directly by the tracked controller on the client. The Teleport_Controller component can be added to any child of a Teleport_SessionComponent Game Object.
3.6. Player Session Hierarchy
Typically, the Unity Game Objects would be arranged as follows in Unity:

==Typical session and player hierarchy in Unity==
i.e. at the root, an object containing a Teleport_Session Component, which tracks client-specific session data. Below this, a Player object which may move in space. Below that, two controllers and a head tracking object.
TeleportVR : Teleport_Session Component
Player
Left Hand Controller: Teleport_Controller Component
Right Hand Controller: Teleport_Controller Component
Head: Teleport_Head Component
3.7. SDK Reference
- doxygenclass:: teleport::TeleportSettings
project: TeleportUnity members:
- teleport.Monitor : MonoBehaviour
A singleton component which stores per-server-session state.
Public Functions
- delegate Teleport_SessionComponent CreateSession ()
Create a new session, e.g. when a client connects.
Warning
doxygenclass: Cannot find class “teleport::TagHandler” in doxygen xml output for project “TeleportUnity” from directory: G:/Jarvis/workspace/Teleport/Teleport/build_docs/docs/doxygen_unity/xml
- teleport.Teleport_SessionComponent : MonoBehaviour
This component manages a client session, so there is one Teleport_SessionComponent per session, and this typically is attached to the root GameObject of each client.
Warning
doxygenclass: Cannot find class “teleport::StreamableRoot” in doxygen xml output for project “TeleportUnity” from directory: G:/Jarvis/workspace/Teleport/Teleport/build_docs/docs/doxygen_unity/xml
Warning
doxygenclass: Cannot find class “teleport::StreamableNode” in doxygen xml output for project “TeleportUnity” from directory: G:/Jarvis/workspace/Teleport/Teleport/build_docs/docs/doxygen_unity/xml
- teleport.StreamableProperties : MonoBehaviour
Component to store a gameObject’s streamable properties, e.g. priority.
Public Members
-
int priority = 0
Priority. Values greater than or equal to zero are essential to functionality and must be streamed. Negative values are optional, and the more negative, the less important they are (determining order of sending to client). The larger the priority value, the earlier the object is sent.
-
int priority = 0